Wednesday, November 21, 2012

Roast potatoes, two ways

You're in for a serious treat today. I don't know if it's just in our South African culture, but we love roast potatoes...Years ago all I knew was a very standard, white fleshed potato, but now-a-days we've got the most beautiful varieties available in our local stores and they were the inspiration for this shoot.

This is where I think it all started for me... Just before I turned four, my parents took my siblings and I on the adventure of our lives. They bought 'Round The World' plane tickets and we flew to Canada where my father would work for most part of the year and we'd travel from there. I firmly believe this is where my love for  vegetable gardening started. You see, previously we'd lived in Namibia, a country that is mostly desert, so my father just loved the fertile Canadian soil and generally, the fact that things grew. We had a huge garden in comparison to our house and my father grabbed the opportunity and planted rows and rows of potato and mielie plants (corn plants). I'm still not sure if he accidental planted too much or if he was convinced he had to stock up for the snowy winter months, but I have memories of a mountain of corn and potatoes in our basement after our harvest and spending our evening cleaning corn cobs as a family.
In the little village where we lived, there was quite a large Ukrainian community and my mother was taught how to make potato Peroghi's, but that's for another day and another blog post...


Today I just want to share two creative dishes which are so, so easy, and in case you haven't picked that up, I'm all about fuss-free cooking. These are more tips, than actual recipes, so feel free to give it your own unique twist!

For this roast potato dish, you'll need a  variation of potatoes. Go to the local market and find as many varieties as you can. Organic potatoes are packed with 'of the earth' flavour. I also added some sweet potatoes cut into wedges, a good drizzle of olive oil, sage leaves from the garden, baby leeks and sea salt flakes with coarsely ground, black pepper. Roast this for about 30 minutes, then give it a good mix, making sure that everything is coated in delicious olive oil and roast for a further 10-15 minutes until crispy. Serve it with a whole roasted chicken or even a pork roast, the sweet potato is lovely with pork.


The next 'recipe' is once again very, very simple. It's more in the technique than anything. You'll need some medium sized roasting potatoes. Give them a good wash and take a very sharp knife and cut thin slits into the top of the potato about half way through the potato. Arrange then in a roasting tray, drizzle with olive oil and season well. Roast them at about 180 degrees Celsius for about 30 minutes or until they are cooked through and the tops are crisp and pulling apart. Serve them with sour cream and lemon zest as a delicious accompaniment to a roast.

Enjoy!

This picture was taken of my brothers and I in our vegetable garden, to send to our family back in South Africa.


Friday, September 28, 2012

Marshmallow Pavlova


I've been meaning to share this recipe on my blog for some time now. It's one of those recipes that have become an all-time-favourite in my family while growing up and even makes the cut as a birthday 'cake'! This recipe was introduced to me by a friend's mother, who was the undoubted pavlova queen, but  over the years this has somehow become uniquely ours with every flavour under the sun having been tried, from passion fruit curd and summer fruit, to whipped cream and raspberries.

The thing I love about this recipe? It's one of those make-ahead-recipes, so don't decide an hour before the picnic to whip up a pavlova! This recipes needs a little time, but will never fail you in the wow-factor of it's presentation. I just love people reactions when you present them with a crisp pavlova, filled with soft whipped cream and summer berries!


So, the trick is to get a really crispy outer crust and a spongy, marshmallow centre, the options are limitless from there! This is achieve by two very simple things, a tablespoon of cornflour and resting the pavlova in the oven, overnight. Proving to a last-minute-gal as myself, sometimes it's worth planning ahead...

Marshmallow Pavlova

Ingredients:

4 egg whites
1 cup castor sugar
1 tbsp corn flour
1 tsp vinegar
300ml cream
2 tsp vanilla extract
1 tbsp icing sugar
1 punnet cherries/raspberries/fruit

Preheat the oven to 100 degrees Celsius
Beat the egg whites in a bowl until soft peaks form, adding the vinegar and gradually adding the sugar until it has all dissolved. Fold in the sifted cornflour.
Spread the meringue in a circle (about 20cm in diameter) on wax paper or a silicon sheet. Don't flatten the mixture too much, you want to get some height. 
Bake for 1 hour -1 1/2 hours until dry and crisp on the outside.
Allow to cool overnight in the oven.
The next day, whip the cream, add the sifted icing sugar and vanilla extract and serve with cherries or seasonal fruit!

Sunday, September 16, 2012

Baby potato salad with watercress and radishes


Okay, it's official, Spring is here. This is a beautiful salad for a garden lunch and is prefect for this time of the year. It's still hearty, but has a lovely Summer freshness and crisp.

I love potato salad and love trying new and different ingredients in them... It all started when I visited Dublin and went to Cornucopia, this gorgeous little vegetarian cafe that serves good 'honest' food. You could immediately tell by the ques of vastly diverse people waiting to be seated every lunch time that there was something special about their food. I didn't quite get that term 'honest food' until I visited Cornucopia... One of their acclaimed dishes from their daily buffet menu is their potato salad with hazelnuts and home made garlic mayonnaise. Amazing! A serious surprise to me and it's taken me down the slippery slope of adding nuts and seeds to most things...be it an open sandwich or a simple green salad. 
 
So apart from Cornucopia's salad, next on my list of amazing potato salads is this one. A simple vinaigrette of red wine vinegar, whole grain mustard and good quality olive oil drizzled over warm potatoes. Oh and garlic, did I forget the garlic? ...I used the pink skinned potatoes for something a little different and added some radishes for a fresh crunch.
 
 
Ingredients:
(makes 4-5 portions)
 
16 baby potatoes
5 radishes
a bunch of watercress
1 punnet of sugar snap peas
a handful of frozen peas (optional)
salt and black pepper, to taste
a handful of fresh basil leaves
 
Dressing:
3 tbsp red wine vinegar
6 tbsp olive oil
1 tsp whole grain mustard
1 garlic clove, finely chopped 
salt and black pepper
 
Method:
 
Firstly, half fill a pot with water and wash the potatoes.
Add a pinch of salt to the water and put the potatoes in the pot. Bring them to the boil.
Make the vinaigrette by adding all the ingredients into an empty jam jar or bottle and give it a good shake.
When the potatoes are soft drain them and cut them in half. Drizzle the dressing over them while they are still hot. They'll absorb the delicious flavours.
Allow them to cool. Blanch the peas by pouring boiling water over them and allowing them to stand for 5 minutes or so. Drain them.
Toss all the other ingredients together and garnish the salad with freshly torn basil leaves.
 
Enjoy!


Tuesday, September 4, 2012

Marbled bundt cake


This year has really taken me by surprise, it feels like just the other day I was thinking to myself that another two months of cold, wet winter days awaits us and somehow, here we are, on the official 4th day of Spring, but really the first. The birds seem to know it, the trees seem to know it and the definate smell of Spring hangs in the air as the sun is setting over the mountain. As happy as I am about Spring making it's first appearance I still have some Winter recipes to share before I start day-dreaming about pink peaches and plums, floral fabrics and pretty things...

My life has been somewhat of a whirlwind lately, studying part-time, food styling and catering. So much so that I have been a little bad with blogging regularly I'm afraid. So this is a very apt recipe for just a time as this, when you're trying to do the laundry, finish some work on your laptop and quickly bake a friend a wow-factor birthday cake, all before the day is out... 

There was a time I was baking 15 of theses marble loaves a day when I was working at La Maison de Gourmet! Just the thought makes me tired and this was just one of the items on my daily production list! Now I stick to one at a time, I'm happy to report.

Ingredients:

250g butter
250g castor sugar
4 eggs
420g flour
2 tbsp baking powder
1 cup milk
1/4 cup cocoa
2 tbsp espresso or strong filter coffee
1/2 tsp vanilla extract

Method:

Preheat the oven to 180 degrees.

In a large bowl, beat the sugar and the butter together until light and fluffy. Add the eggs, one at a time, beating well after each one.
Sift the flour and the baking powder together and add half of the dry ingredients to the butter mix then add half a cup of milk. Repeat with the remaining dry ingredients and the rest of the milk.
Divide the batter into two bowls, equal amounts.
Add the vanilla extract to the one bowl and the sifted cocoa and coffee to the other bowl.
Mix each batter well.
Grease a large bundt cake tin and spoon alternate dollops of cocoa and vanilla batter into the tin.
Using a skewer, swirl the batters to create a marbled effect.
Bake for 40-50 minutes until an inserted skewer comes out clean.
Cool on a wire rack and served drizzled with ganache or simply dusted with icing sugar.

For a simply ganache: Measure equal weight of good quality dark chocolate and cream in separate bowls. Heat the cream to boiling point and throw it over the chopped chocolate. Allow it to stand for 5 minutes, then with a whisk, mix the mixture until all the chocolate is melted. Pour this over the cake when it has cooled and garnish with pomegranate pips and pistachios.

Enjoy!


Tuesday, July 24, 2012

Panzanella Salad


The reason I love this salad is that it's simple to make and it consists of some of my favourite ingredients... Fresh buffalo mozzarella, tomatoes, capers, red onion - how can theses delicious flavours not create something awe-inspiring together!

I thought I'd share the story of my first taste of buffalo mozzarella, the real thing. When I was living in Dublin, working long night shifts in a French bakery, I lived with a young Italian woman (I thought that was the best way to describe her). She was everything you'd expect an Italian woman to be, confident, matter- of-fact and a lover of food, of course. So every now and again when our busy schedules would coincide and we'd bump into one another (quite literally) in our tiny kitchenette and I would subtly ask her all sorts of questions about authentic Italian cooking.
So, when she heard that I hadn't ever eaten real buffalo mozzarella (the kind that pulls apart in layers and is good enough to eat on it's own with only course salt and black pepper) she couldn't believe it.

Her parents were due to arrive for a visit in the week to follow, so she asked them to bring a mozzarella cheese all the way from Italy! To this day, I am not exactly sure of the long journey it travelled to our little kitchen, but I do know that it involved a train journey and a flight. Sure enough, they arrived proudly with a huge  mozzarella ball gently floating in it's brind packaged in a polystyrene box! And to say it was the most delicious mozzarella, and that I have since not tasted anything close to the delicate flavour and soft texture of that very cheese, wouldn't be an exaggeration.

My mother introduced me to Panzanella salad. It was after one of her European holidays that she came back raving about this simple and delicious salad. This is my version and is  probably a little more modern and not quite so authentic. I make chunky croutons from slightly stale ciabatta which is so addictive! What doesn't get eaten while making the salad gets used in it, so make double the quantity needed, trust me on this one. Enjoy!

Panzanella Salad

(Makes 4-6 portions)

2 big buffalo mozzarella balls, torn
1 red pepper, roasted, peeled and chopped
2 tbsp capers/caper berries
1 red onion, thinly sliced
300g tomatoes (plum, vine, rosa)
1/3 loaf of crusty, stale bread
1/4 cup good quality olive oil
salt and black pepper
a bunch of basil leaves
6-8 anchovies (optional)
2 tbsp red wine vinegar
1 garlic clove, thinly sliced

Method:

Break the bread into bite sized chunks, drizzle with olive oil, salt and pepper and roast in the oven until golden and crispy.
Toss all the ingredients together, keeping everything chunky.
Make a simply vinaigrette by whisking the red wine vinegar into half of the olive oil. Drizzle this over everything and toss the salad.
Garnish with fresh torn basil leaves and the finely chopped red pepper.

Sunday, June 24, 2012

Tomato Soup


I'm huddled in front of the fireplace on a very cold and rainy June evening and the sound of the crackling fire and the hum of my laptop are the only sounds in the house. The rain has finally stopped. This is the perfect time for a quick blog post before the busy week starts, I think. And what better way to bring a little colour and cheer into this grey day than write about tomato soup and share these beautiful pictures with you...

I never quite got tomato soup until I started roasting the tomato's, and my life was changed really. Now I'm hooked. In my catering company the napolitana sauce is one of the basic sauces we use almost daily, so there's nothing as easy as diluting that intense deep red sauce into the quickest and cheekiest dinner for my husband and I, served with home-made ciabatta croutons, what could be better?


I'm quite passionate when it comes to soups and as I've mentioned in one of my previous posts, the fact that soup makes the cut as a  main-meal in my books, was something my husband had to grow use to. Soups are one of those dishes you just need to try, throw yourself into it with abandon and gain the confidence you need to make them following simply your nose and your taste buds. Once you're there, the options are endless! When I think of soups, I think of a dear friend of mine who would ask me the same question over and over, "how much stock or water do I add?". The answer was always the same,"...I don't know, about 1 liter, you need to taste it and see". It comes down to feel and getting the seasoning and thickness just right, so there is a little skill in making a good soup, I must admit.

Roast Tomato Soup
(Makes 8-10 portions)

Ingredients:
1 onions, roughly chopped
2 tins whole, peeled tomatoes
2 garlic cloves, sliced
2 tbsp tomato paste
4-6 whole organic tomato's
roasted vine tomato's for garnish (optional)
2 tbsp olive oil
1-2 tsp brown sugar
salt and pepper to taste
fresh basil/parsley/sage to serve
1 liter vegetable stock
ciabatta bread
1/4 cup good quality olive oil (for croutons)

Method:
Preheat the oven to 180 degrees Celsius.
Cut all the tomatoes in quarters, place them in a roasting tray and drizzle them sparingly with olive oil.
Season with  salt and black pepper.
Roast in the oven for about 20 minutes at 180 degrees Celsius.
In a large pot, slowly saute the onions and the garlic until soft and translucent.
Add the soft, roasted tomatoes and the tinned tomatoes.
Add about 750ml of vegetable stock to the pot and bring to the boil. Turn the neat down and simmer for 20 minutes.
Blend the soup with hand held blender until smooth and add the sugar.
Taste the soup and dilute with the remaining stock, if needed. Adjust the seasoning.

To make the croutons: Tear the bread into chunky, bite-sized pieces. Drizzle with olive oil, season with salt and pepper and roast until they are golden brown and crispy.
Serve this soup with croutons, fresh herbs and a drizzle of good quality olive oil.

Wednesday, June 20, 2012

Grapefruit

When I was a little girl my mother would give me half a grapefruit sprinkled with sugar, each segment delicately cut loose for me to eat it more easily. I still remember that bitter sweet deliciousness, it's such a fond memory, but thinking about it now I realise it was quite unusual for me to be eating, not to mention enjoying grapefruit at that age! Somewhere along the line, probably when I started doing my own shopping and choosing what to fill my fruit bowl with, grapefruit didn't quite made the cut and many years passed without me giving them much notice.

Then, a few months ago, a Taiwanese friend of mine invited my husband and I over for a traditional meal prepared by his mother who was visiting at the time. I was flattered that she wanted to teach me a traditional (with a South Africa twist) version of a rice flour tray-cake. So there I was, learning a little about Asian-style baking, a real first for me. For one, a small bowl was used for measurements, which generally seemed less precise and a lot more about 'feel'.

When we had all eaten more than our fare share and were waiting for the cake to cool, his mom disappeared into the kitchen and came back bearing gifts - a yellowish grapefruit and spiky dragon fruit! I had only seen dragon fruit in Indonesia at the road side stalls but was never brave enough to buy one. She told us that she had grown the tree herself from a fruit many years ago. We all sat around the dining room table sipping cup after cup of jasmine tea and nibbling on the most delicious grapefruit and dragon fruit chunks. The grapefruit was a variety that I hadn't tasted before with a more yellow peel and a light pink coloured flesh, just beautiful.

It's as if my appetite for grapefruit has been reawakened and I have since come up with some adventurous recipes using them.
Here are two inspirational ideas if you share my sentiments about the very under appreciated grapefruit.

   
Firstly, I made a beautiful salad with locally smoked salmon trout, grapefruit segments, radishes and radicchio, using grapefruit juice in my vinaigrette. Another idea is when roasting beetroot in the oven, add some slices of grapefruit to sweeten and caramelise in the pan with the beetroot, add some blanched baby leeks and you've got a delicious veggie side dish. 

Enjoy!

Wednesday, June 6, 2012

Operation: Wedding Cake

As much as I boldly say “I don’t bake wedding cakes anymore”, I am trying unsuccessfully, to put that phase of my career behind me. You see, there are a few opportunities that I simply can’t resist – like my brother’s wedding day! And frankly, what makes a more apt wedding gift to a sibling than the wedding cake itself! Don’t get me wrong, it’s not that I don’t enjoy making wedding cakes…

So, years after O My Darling Cakes has been shelved and my piping bag and pallet knife are by far the least used tools in my kitchen, I find myself phoning a friend to ask her which is the best butter to use for butter cream icing. The problem is that most of the butters available in the stores are so yellow that is would definitely not give me pure white butter cream – crucial for a wedding cake.

Like most wedding cakes I’ve baked, this one was a journey. From high points like eating warm buttermilk sponge off-cuts late at night, to the general low point of piping for 6 and a half hours...What a great thing to blog about I thought, share my ups and downs with you…The idea was to take some pictures as I went, which didn’t transpire in the least (I think I snapped some on the first day) So, this comes a little outdated, three weeks after the wedding, but better late than never, they say.

I thought I’d share the very easy butter cream icing recipe I used. I did make about 6 batches so feel like a little bit of a butter cream snob (expert). But first, let me tell you a little more about the cake itself...My new sister-in-law had some adventurous ideas, first being to make a 'rainbow cake' for her wedding – a huge trend at the moment. Being very diplomatic, I convinced her to instead have three colours of a hot pink, lighter peach and white vanilla sponge. (After the first blue-coloured sponge came out the oven green, I knew it was time for drastic measures to be taken) The second obstacle was the fact that the icing technique was something I’d never seen or done before. Thanks for nothing, Pinterest.

I’d would like to report that considering the obstacles, this wedding cake was a breeze and one of the cakes I am the most proud of for sure, but I am rather relieved that my next one isn’t for another 4 months!


Vanilla Buttercream (Swiss Method)

Ingredients
600g unsalted butter, at room temperature
1 recipe Swiss Meringue
1 tsp vanilla extract
140g good quality white chocolate, melted

Swiss Meringue Recipe
240ml egg white
400g castor sugar

Method

Combine the egg whites and the sugar in a mixing bowl. Place the bowl over simmering water and heat to 60 degrees Celsius, whipping constantly to avoid cooking the egg whites.
Remove from the heat and whip the mixture on a high speed to lukewarm.
Cut all the butter into evenly sized blocks.
Lower the speed on the mixer and add the vanilla.
Gradually whip in the butter until everything is combined and the icing has a soft whipped butter consistency.
Slowly mix in the melted white chocolate when all the butter is mixed in.

Note: This icing will set hard in the fridge. It is ideal for wedding cakes or cupcakes. Add flavouring like orange zest, 2 tbsp of strong coffee or liqueurs.
It also freezes very well. Simply thaw and whip to the right consistency!

Friday, May 11, 2012

Red Wine Poached Pears


This is a seared pork fillet and red wine poached pear salad I made. I know this might sound like an odd (to put it politely) combination, but there's something so lovely about the texture of a soft poached pear in a salad. I generally like to over do it when it comes to fruit, I need no excuse to combine most things with it. But red wine poached pears somehow bridge that gap between savoury and sweet and can become the most delicious dessert or be tossed in a salad on a autumn day. 

This salad idea was borrowed from a rare roast beef and red wine poached pear salad I had seen in a magazine, while looking for inspiration for a shoot. And this beautiful photo was taken in my second food styling shoot with a photographer-friend who now travels all over South Africa with a well-known documentary filming company. It was that clinching shot that made my day and caused me restless nights until I could finally received my copy of the images. And it did make the magazine paging, shopping, lugging, prop-hunting and cooking all the more worth it...

But the actual hero of the day is the red wine poached pears. It is one of those little tricks I learn early on in my cooking endeavors...I think I must have still been in high school, but it's one of those timeless little tricks I like to pull out of my hat when I'm really trying to 'wow a crowd'. Since then, I baked a red wine poached pear and chocolate cake (definitely a recipe for a future post) when I was working as a pastry chef in a boutique hotel (and do they love chocolate!) and tried many more combinations.

So, I am really doing you a huge favour by showing you how incredibly easy this is, and no, they will never be uncool or old-fashioned in my books. I will leave room for you to be very creative with this recipe, think these pears wrapped in puff pastry with home-made vanilla bean ice cream, think rare roast beef, rocket and poached pear salad...


Red Wine Poached Pears

The first tip I can give you is to not buy pears that are too ripe. Then, whenever cooking with wine, use the best wine you can afford. Many cooks think they can get away with using a cheaper wine, but the flavours are intensified during cooking and especially when the poaching liquid is reduced. A good, spicy Shiraz will be lovely for this recipe.

Ingredients:
750ml of good quality Shiraz or Merlot
250ml of sugar
2 cinnamon sticks
1 star anise
two long curls of orange rind
6-8 firm pears, peeled

In a big pot - place all the ingredients, except the pears. Bring this up to a gentle boil and stir a little until all the sugar is dissolved.

Peel the pears (only when the poaching liquid is ready) leaving the stalks on.

Bring the poaching liquid to a simmer and gently lower your pears into the pot by the stems. They will float about, so don't worry if they don't stay upright.

Cut a wax paper circle the same size as the pot and put this over the pears to help them stay submerged under the poaching liquid. Poach for about 30 minutes or until the pears are a deep purple red colour and are soft. Remove the pot from the heat and allow the pears to cool in the poaching liquid. Use them as desired!


Sunday, April 15, 2012

Curly Kale

So, I have a little confession to make, although it is one of the most common vegetables in Europe, kale is quite new to me as a chef sitting on the most southern tip of Africa. I first came across kale when I was living in Ireland in that delicious dish, Colcannon (the Irish seem to be experts at combining potatoes with pretty much anything) but I haven't been able to source it at our local markets. Then last weekend, on my most recent visit my parents guest house, there they were in a little row, upright and proud kale plants begging to be harvested. Of course, like most of my short visits, I tried something new and cooked my first kale dish.

So, I can promise nothing awe-inspiring as I am a beginner at this myself and wanted to keep the kale as simple as possible to really appreciate the flavour. After asking the advice of the British guests staying overnight in the guest house over dinner, we settled on sauteed kale with onions, garlic and bacon.

Here is the simple recipe, might I add that kale is in fact a nutritional superstar! It has higher levels of antioxidants than almost any other vegetable and is full of cancer-fighting compounds, beta-carotene, Vitamin A and C, amongst other goodies. So, step aside quinoa, kale is the new super food!

Ingredients:

1 large bunch of kale leaves
1 large onion, finely chopped
1 garlic clove, finely chopped
6 rashers of streaky back bacon
1 tbsp good quality olive oil
salt and pepper, to taste

Method:

Wash the kale leaves and remove some of the stalks and veins, if needed.
Heat a big pan and slowly saute the onions and the garlic on a low heat.
Add the bacon bits and saute, rendering some of the fat off the bacon.
Add the roughly chopped kale leaves and saute for about 10 minutes until tender.
Season with salt and pepper, to taste.
Serve as a side dish - delicious with pork.


Wednesday, March 28, 2012

Warm brownies on an Autumn day...


I just took a warm batch of brownies out of the oven and couldn't resist cutting a corner right out of the tray... Brownies are good, but warm brownies take it to another level.
Dark chocolate gets moved to the back of my pantry shelf in summer when there are raspberries and other beautiful stone fruit to distract me, but as Autumn creeps up on us and the days get cooler, I start dreaming up recipes with cinnamon, preserved ginger and dark chocolate. There's something just RIGHT about brownies in Autumn.

So, while I am supposed to be costing a recipe for a function this week, putting in orders and just generally being productive, here I am blogging about this brownie recipe which is really a MUST in any bakers' repatoir. I know, I know, you've heard it all before and I bet you've got your own favourite brownie recipe you swear by.

Well, let me tell you a little about how this recipe became my favourite and I may just convince you that this it's worth trying. It's quite funny really, but like many pastry chefs, my love for baking started with a humble brownie recipe. Nothing fancy, no raw chocolate, cranberries or white chocolate chips, just a good ol' faithful brownie, made with regular ingredients.
From there I never did get into the way-out flavours, to me it's more about getting that balance between a dense texture, an intensely dark chocolate taste and just the right amount of sugar - the perfect compliment to a cappuccino, is how I like to think of it.

This recipe landed in my inbox when I asked a fellow pastry chef friend of mine if I could try the recipe she was given when she was at a very well known chef school many years ago. I was looking for a recipe with a dense texture, obviously, rule number one when baking brownies is not to over bake them, but there is still something to say for a reliable recipe, that can be baked over and over and never seems to let you down. I'm hoping you sense my passion here.

So, a few tweaks later, this is it, I can confidently say. At most, I add chopped hazelnuts because there's something just SO right about combining hazelnuts and dark chocolate but I'll allow you to take it from here and add whatever your heart desires, to make it yours.


Brownie Recipe

175g butter, plus extra for greasing
5 large eggs
220g castor sugar
220g brown sugar
175g cake flour
100g good quality cocoa powder
100g hazelnuts, roughly chopped (optional)

Preheat oven to 170°C. Line a brownie tray or large cake tin with greaseproof paper after greasing it generously.

Very gently melt the butter in a saucepan and leave it to cool. Using a wooden spoon, beat the eggs with the sugar in a large bowl until creamy and smooth, then slowly stir in the cooled butter.

Stir the flour and cocoa powder into a large bowl. Gradually add the egg mixture until smooth, then fold in nuts and keep a few aside to sprinkle on top.

Pour the mixture into the prepared tin and bake for 25 – 30 minutes until risen with a cracked, crusty top. Be very careful not to overcook them, as the cooking time may vary slightly in different ovens.

Cool in the tin for about an hour, or until completely cool before cutting them in squares. I like to dust them with cocoa powder.
Variations - adding cranberries, white chocolate chips, dark chocolate chips, macadamian nuts, pecan nuts and the list continues...


Thursday, March 22, 2012

Berry Bliss

So much for new beginnings…This years' blogging is off to a not-so-good start, but with a little inspiration and better time management, VOILA! We have a new post!

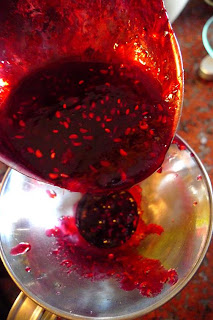
I have had this blog post brewing for some time now and am dying to share this very easy, anyone-can-do-it jam recipe as well as these fun pictures I took in December. Yes, you heard right, these photos were taken in December! I have however, resisted the temptation to scrap the idea all together, as Autumn in sneaking up on us and the idea of a summer berry jam seems kind of, well, out-dated.

In December, every December, I get this home-sick longing to just be at my parents' old house, just breathing in the familiarity and reminiscing back to my childhood in that beautiful house with all its' creaks and its' magical big garden. As I’ve mentioned so many times on this blog, the thing I love most about those times is how my family gravitate towards the kitchen and what to eat for the next meal becomes the order of the day (excuse the pun). Not only that, but there always seems to be some mini harvest of sorts, be it potatoes or artichokes or berries…

So, I’m going to be very honest with you. My mum and I are very similar in the fact that we like unfussy cooking and recipes aren’t taken too seriously, but rather used as inspiration – we really do believe that almost every recipe can be improved and added to. So when I called her to ask her for the recipe of her mixed berry jam, the one we made only 3 months ago, her answer went something like, “Oh, a recipe? It’s about 800g sugar to 1 kg of mixed berries”. And that was that, need I say more.

This leaves me with the sad conclusion that no jam you or I for that matter, make will EVER be the same as last years summer berry jam. I must say, that does put a smile on my face because I’m sure the next batch will be pretty awe-inspiring with some orange zest added to it…
Mixed Berry Jam

Jam is one of those things that might seem a little daunting to try for the first time and it’s also something you need to get a FEEL for. So, I think it’s going to be easier to resign yourself to the fact that there will be at least one batch of jam that you will not be entirely happy with. Cooking jam too long will give you a very sticky thick jam, perfect for jam cookies and a jam that’s too runny? Well, I’ll leave you to be creative with that one…

Note: This recipe has no pectin or gelatin as we simply used a few handfuls of berries that were less ripe. You might have to add pectin if your berries are shop bought.


Ingredients:

1 kg mixed berries (raspberries, blackberries, blueberries)

800g white sugar (this can be reduced to 500g for a less sweet version)

Juice of 1/2 lemon

Method:

Put the berries in a large bowl and sprinkle the sugar as well as the lemon juice over it. Leave it to rest for about two hours.

While you are waiting you can start preparing the jars. Now, keeping in mind that I like to take the shortest and  easiest method when cooking, do the following: Heat your oven to 200 degrees Celsius. Rinse your jars and place them in the oven for 5-7 minutes or until dry and very hot. Remove them with tongs. Boil the kettle and pour hot boiling water over the lids and allow them to stand in the water for 5-10 minutes.

Put the berries in a big pot and place this on a medium heat. Bring it to the boil and boil it for 30 minutes, stirring occasionally. A light coloured foam will appear on the surface, gently spoon this off. This will ensure a clear jam. After 30-40 minutes the jam should be thick and reduced. Spoon a little bit on a cold plate and leave it to cool to check the consistency.

Gently pour into hot jars and seal with hot lids. Be sure to wash your hands and not touch the inside of the jars or the bottom of the lids.

Store in a cool, dry place.

Yield: 4-6 medium sized jam jars